Incoming Referrals: Shelters Module
This article explains how to respond to Referrals sent by Centralized Intake for the following project types, which utilize the Shelters Module for data entry:
- Emergency Shelter (ES)
- Transitional Housing (TH)
- Single-site Permanent Supportive Housing (PSH)
HOW TO LOCATE INCOMING REFERRALS
Referrals sent by Centralized Intake to programs that utilize the Shelters Module (ES, TH, and single-site PSH) can be accessed on the program level. Any incoming referrals will be listed in Outstanding Referrals section located below the project's Unit/Bed List in the Shelters Module.
HOW TO DECLINE/CANCEL A REFERRAL
If the client's Referral is being Accepted and client will be checking into the program, do not follow this workflow. Proceed to the next section for instructions.
1. Click the pencil edit icon next to a client whose Referral is being closed out.


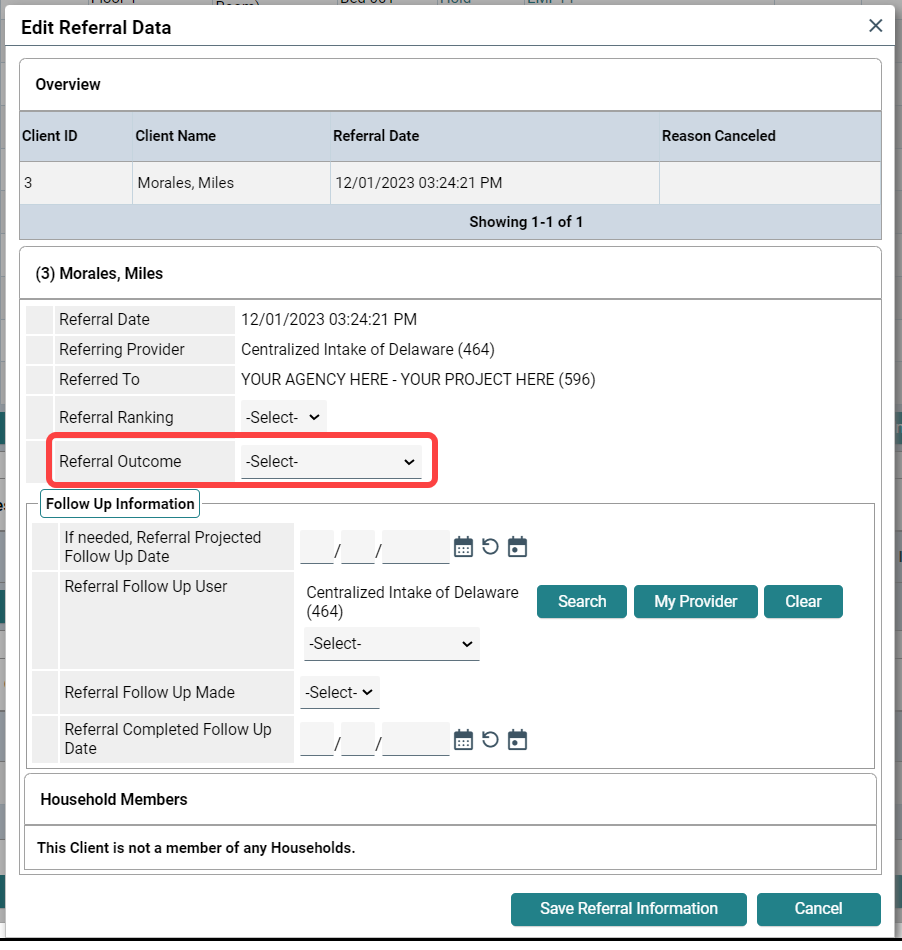
2. The Edit Referral Data window will appear. Update the Referral Outcome, located under the client and Referral information.
- Select Declined if your organization is choosing not to proceed with the client's Referral for any reason.
- Select Canceled if your organization cannot proceed with the client's Referral due to a decision on the client's side.
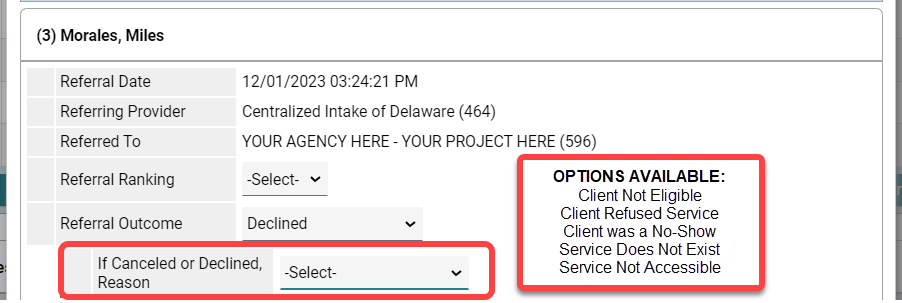
3. If "Declined" or "Canceled" is selected for the Referral Outcome, another assessment line appears that says, "If Canceled or Declined, Reason". Select the option that best matches why the Referral was not accepted.
4. No other information on the Edit Referral Data page needs to be updated. Click the Save Referral Information at the bottom of the window to update the Referral.
The client's name and Referral information will be removed from the Outstanding Referrals section of the Shelters Module.
The client's name and Referral information will be removed from the Outstanding Referrals section of the Shelters Module.
HOW TO ACCEPT A REFERRAL
Checking the clients into a program through the Shelters Module will accept the Referral sent by Centralized Intake. Not following this workflow will result in issues with reporting.
1. Click the bed check in icon next to the Head of Household client (if checking in a family) whose Referral is being accepted.
2. Clicking the check-in icon brings up the client's Check In screen.
3. Fill in the Check In screen to complete project entry process through the Shelters Module.
Once the client is checked in and on the Unit List, the Referral Outcome will automatically be updated and the Referral information will be removed from the Outstanding Referrals section of the Shelters Module.
Once the client is checked in and on the Unit List, the Referral Outcome will automatically be updated and the Referral information will be removed from the Outstanding Referrals section of the Shelters Module.
Related Articles
Data Entry PowerPoint: Shelters Module
See attached for the most recent version of the Shelters Module Data Entry PowerPoint. This PowerPoint provides step-by-step directions on how to enter data using the Shelters Module, which is used for the following Project Types: Emergency Shelter ...Referrals Report
INTRODUCTION The Referrals report is a canned report available in CMIS. The Referrals report provides a list of all clients who were referred to or from one project in CMIS to another, as well as outcomes for those referrals. For agencies that ...Incoming Referrals: Clients Module
This article explains how to respond to Referrals sent by Centralized Intake for the following project types, which utilize the Clients Module for data entry: Rapid Rehousing (RRH) Scattered-site Permanent Supportive Housing (PSH) HOW TO LOCATE ...FY25 CMIS Documentation
Please see the attached documents to this article, to have access to and reference the most recent version of CMIS documentation made available by Housing Alliance Delaware, CMIS Lead Agency. Newer versions of the listed documents may be uploaded to ...Data Entry PowerPoint: Clients Module
See attached for the most recent version of the Clients Module Data Entry PowerPoint. This PowerPoint provides step-by-step directions on how to enter data using the Clients Module, which is used for the following Project Types: Emergency Shelter ...